Showing posts with label dessert. Show all posts

Wednesday, March 31, 2010

vanilla cupcakes with raspberry cream filling

I'm just a tad embarrassed that since starting this blog, I have literally not lived up to my name.  "Cupcakes and Catwalks" was meant to showcase two of my passions - baking and fashion. And while I think I've been keeping up with both topics, there are no posts of any sort to do with cupcakes or catwalks!

As they say, it's better late than never. So with that I present to you my inaugural cupcake venture:

What you can't see in this picture is the yummy layer of raspberry cream tucked in underneath layers of cupcake.  Mmm.


Plump, juicy raspberries are just starting to hit the grocery stores again, and work perfectly in Giada's delicious cupcake recipe. The fresh raspberry cream is delectable - so light and refreshing!  I made my vanilla cupcakes from scratch, but any recipe will do.  (Yes, even a Duncan Hines 'recipe' - don't worry, your secret's safe with me!)

Sunday, March 14, 2010

lazy sunday


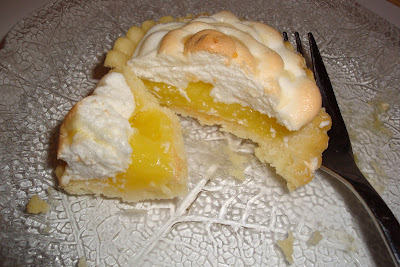
Okay, so for those of you who chastised me for not liking pie crust - I made another dessert, this time with crust! They're miniature lemon meringue pies made with some leftover homemade lemon curd that I had in my fridge. And they are delicious (yes, I even ate the pie crust after).

I'd like to share this fantastic lemon curd recipe from the LCBO's Food and Drink magazine. With just the right amount of lemony zing, it's the perfect starting point to some great desserts. I made little strawberry cheesecakes last week and topped them off with a generous dollop of this lemon curd. Also, I think it'd make for some pretty killer lemon squares.

Zingy Lemon Curd (from Food & Drink Magazine, Spring 2010)

Ingredients
  • 3/4 cup lemon juice (about 3 lemons)
  • 3 eggs
  • 1 cup granulated sugar
  • 1/4 cup (60 mL) butter, softened
Directions

1. Stir 3 eggs with 1 cup sugar in a small saucepan over low-med heat.
2. Whisk in lemon juice and softened butter.
3. Continue whisking constantly for 10-12 minutes or until mixture thickens. DO NOT let mixture boil (otherwise you'll be left with little bits of cooked egg in your curd).
4. Remove from heat and cover surface directly with plastic wrap or parchment paper - this prevents that nasty skin from developing on the top of your lemon curd!
5. Cool until slightly warm.

Lemon curd keeps well in the fridge for about a week, or can be frozen for longer.

Enjoy!

Friday, March 5, 2010

easy as pie

I've never understood the term "easy as pie". It's definitely not that easy to make (though it sure is easy to eat!). To be honest, I've only ever liked the inside filling of pies. If you ever meet a girl with pie filling on the edge of her lips and an empty crust on her plate, chances are, you've probably run into me...hello!

A cousin of mine served these caramelized apples for dessert once, and I've been desperately trying to recreate the recipe. The apples were so tender and comforting, and tasted exactly like that first bite of fresh-out-of the oven, barely-cooled-on-the-windowsill apple pie. Here's what I've come up with so far (recipe follows).

Apples! Spartan, Pink Lady & Crispin

I made two apples' worth of dessert.
These three slices were unfortunately all that was left at the time of the photo shoot!

Warm Caramelized Apples (from Foodland Ontario)

Crispin apples work well for this recipe - they're not too sweet and have a bit of spice to them. Plus, it stays firm when cooked (not mushy like some other apples). You can serve this over ice cream or on top of crepes, but I like to eat it on its own.

Ingredients
  • 1 tbsp (25 mL) butter
  • 1/4 cup (50 mL) brown sugar
  • 1/2 tsp (2 mL) ground cardamom or cinnamon
  • 4 Ontario apples, unpeeled, cored and cut into wedges
Directions

1. Melt the butter over medium heat.
2. Add brown sugar and cinnamon, reduce heat.
3. Add apples and cook, stirring gently, approx 6-8 minutes. (Apples should be tender but not mushy).
4. Serve warm.

Enjoy!

Tuesday, February 16, 2010

i've heard of many chocoholics...

...but I ain't ever seen no 'chocohol'. We got an epidemic, people: people who like chocolate and don't understand word endings. They're probably 'overwork-aholled'.
-Demetri Martin, Comedian

I've taken up a lover and his name is chocolate (He has yet to meet the parents. But I think they'd approve). Over the past week or so, I've been lusting over chocolate desserts. Last Thursday, I made these delicious truffle tarts with a raspberry surprise in the middle. They are quite a fantastic way to use up that old box of Fudge-Os.

Today, some friends came over to bake these heavenly molten lava cakes. Rich and satisfying, these are best served straight out of the oven. We had a few timing issues, but this is a rather forgiving recipe. Although the bottom of the cakes were a little undercooked, those ooey gooey chocolate centres made us overlook the mistake. Now if only chocolate could hide all of our mistakes...

Butter, chocolate and egg yolks - just a heart attack waiting to happen

At this point, I was tempted to eat the batter itself!

Garnishing the molten cakes with strawberries...


All ready to eat!

I just love taking glamour shots of food.

Paula Deen's Molten Lava Cake

Ingredients (makes about 6 servings)

I've converted some of the weights to fit the metric system. Darn Imperialists.

  • 170 g bittersweet chocolate
  • 50 g milk chocolate
  • 150 mL butter
  • 1/2 cup all-purpose flour
  • 1 1/2 cups icing sugar
  • 3 large eggs
  • 3 egg yolks
  • 1 tsp vanilla extract
  • 2 tbsp flavoured liqueur (we used Grand Marnier, but I'd also like to try it with Chambord)
Directions
  1. Preheat oven to 425 degrees F.
  2. Grease 6 ramekins.
  3. Melt the chocolate and butter in the microwave in 15 second spurts, stirring occasionally.
  4. Whisk in flour and sugar to chocolate mixture.
  5. Stir in eggs and egg yolks, blend at low power until smooth.
  6. Add in vanilla and orange liqueur.
  7. Divide the batter into the ramekins and bake for 17 minutes (the original recipe calls for 14 minutes, but ours were still a little too runny. This is the step the requires the most precision, so you may have to play around with your timing to get it right.)
  8. Loosen the sides of the cake with a knife, and invert ramekin onto a plate.
  9. Garnish with strawberries, and enjoy!